Commonly Experienced Microphone Problems and Solutions in 2024
Nothing is more annoying than experiencing audio issues with your microphone right before your recording or meeting. While sometimes you can blame it on your poor-quality microphone, this isn’t the case every time.
As amazing as tech is, it does come with its share of problems. The same applies to microphones. Microphone issues are quite common, so you are not alone in this dilemma.
The good thing is, like every other predicament in the world, there is a solution for every microphone problem too.
Let’s share with you some common microphone issues and solutions, so you know exactly what to do when your mic isn’t working for some reason.

Microphone Access Problems with Their Antidotes
You have connected your wireless mic to your device, be it your PC or mobile phone, but when you speak in it, your microphone does not work. Ugh! What to do now?
Well, the problem, in this case, lies with the access to the wireless microphone system or any other mic that you are using.
Here are the commonly experienced microphone issues pertaining to their access, along with their antidotes.

Permission Problems
When the device or application you are using does not have permission to access your microphone quickly, you will face this problem. You may even see a pop-up intimating you to give access to those apps or mobile devices to use your microphone.
Sometimes, the permission problems are due to the privacy settings of certain operating systems. These settings tend to block the mic’s access.
What’s the Solution?
You simply need to grant the required permission to your app, device, or service requiring microphone access to resolve the problem.
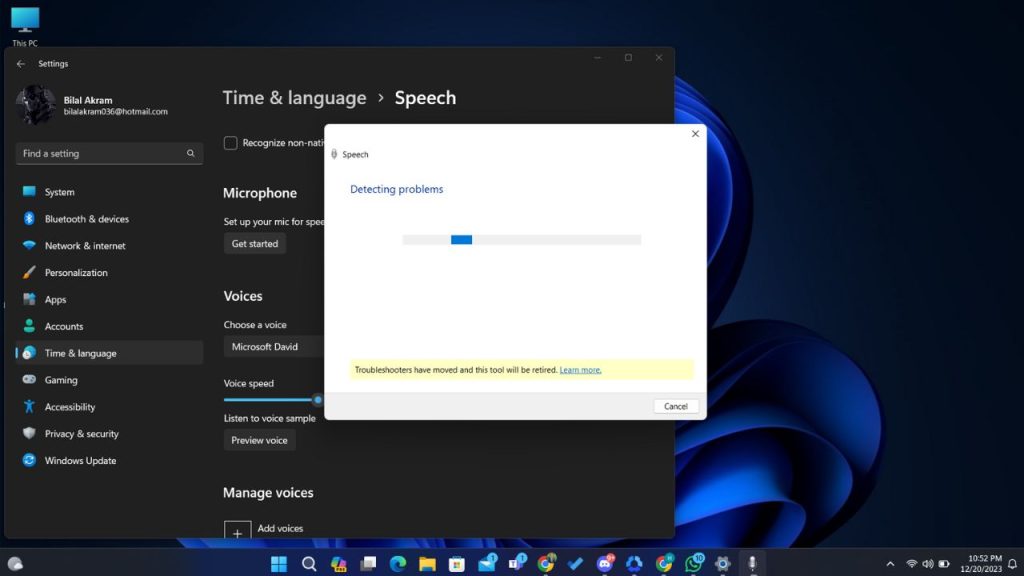
Problems with the Driver and Operating System
If your microphone’s drivers are corrupted or outdated, you are likely to face microphone access problems.
Mics, similar to other hardware parts, depend on the drivers to link up and communicate with your software applications and operating system. Drivers are basically software programs that aid in this communication.
An outdated or corrupted microphone driver or audio driver can present many issues, such as microphone access.
Many reasons can result in corrupted drivers, including system crashes, improper driver installation, and software conflicts. As for an outdated driver, that happens when you fail to upgrade it according to the latest update and version.
Moreover, if your device’s operating system (OS) is outdated, then too, you can have problems with using your microphone. Operating system updates, be it for macOS, Windows, or any other platform, are paramount for enhancing the system’s security, adding the latest features, fixing bugs, and using different devices with it, including a microphone.
Sometimes, these updates bring forth unforeseen challenges, such as disrupting the functionality of an attached hardware device like a mic. Moreover, suppose your operating system or any latest update isn’t fully compatible with the software or drivers your mic relies on. In that case, too, your operating system won’t recognize your mic or result in issues such as sudden muting or audio glitches.
What’s the Solution?
To resolve this problem, here’s what you need to do:
Hardware Connection Problems
Hardware connection problems often lead to microphone access issues.
These issues typically occur when the physical connection between your device (the mic is connected to) and your microphone isn’t solid. This issue is mostly rooted in damaged cables and loose connections.

Damaged cables prevent your system (mobile or computer) from easily accessing your microphone. Cables do wear out with time and can also be injured due to excessive force, pulling, bending, etc. Also, issues with the internal wiring, poor connectors and cheap cable insulation can damage cables too.
Loose connections happen when the cables you’re using to connect your mic to your device aren’t properly plugged in. This can occur at any point in the setup, including the point where the mic is connected to its corresponding cable or where the microphone cable is connected to the device.
Loose connections result in intermittent and terribly weak microphone signal that ultimately leads to microphone access problems.
What’s the Solution?
Here are some potent solutions to this frustrating problem.
Apart from employing these tactics, test your microphone on at least one other device. This is especially important if you are suspicious of some hardware problem. If your mic works fine on the new device, the real problem is likely with the primary device’s connection or port.
Security Software or Malware Problems
Security software typically comprises firewall applications and antivirus programs. It is created to safeguard your computer and phone against different threats, such as malware. Sometimes, these security applications tend to interfere with your mic’s access and can mistakenly block your microphone.
Security software applications sometimes have features that impede your microphone’s access as a precautionary regulation. Malware, potentially unwanted programs (PUPs), or spyware tend to affect your system’s privacy. Some malware hijacks your mic to record your audio without your consent or awareness.
What’s the Solution?
Here’s how you can resolve this issue.
In addition, update your security app and software regularly to benefit from its advanced threat detection and security enhancement features.
Interference by Background Applications
Sometimes, any apps running in the background can conflict with your microphone’s access and operation. Certain apps are designed as such that they prevent the functioning of a microphone, or don’t allow your device to access the microphone.
What’s the Solution?
To resolve this problem, here’s what you need to do:
If you are facing any of these problems, try these hacks and they are quite likely to resolve the issues, and you’ll find your mic working just fine.
Problems with the Wireless Microphone System and their Antidotes
Wireless microphones are extremely versatile and convenient micing options that give you the independence to move comfortably and freely in the room or the stage. As amazing as they are, wireless microphones too come with their own issues.
Let’s discuss the common problems with a wireless microphone along with their probable solutions.
Dropout and Interference Problems
Interference is undoubtedly one of the most commonly faced problems with wireless microphones. It happens when some other signal or device is using the same frequency, or when the nearby frequency is causing any sort of distortion, audio dropout or nouse.
Mostly, interference comes from different sources such as other wireless devices operating in similar frequency bandwidth, radio or TV stations using the same frequency bandwidth, and bluetooth devices, cordless devices, Wi-Fi routers and other wireless gadgets emitting radio waves.
Moreover, ceilings, walls, metal objects may also be blocking or reflecting radio waves that cause interference issues.
What’s the Solution?
To mitigate the dropout and interference difficulties, here are some hacks that you can try.
Experiment with these hacks, and the wireless microphone interference challenges are likely to fade away.
Battery Life Issues with Wireless Microphones
Battery problems often accompany many wireless microphones. They tend to result in distortion, low output, noise, or even the failure of the microphone system.
Usually, battery issues with wireless mics arise due to the following reasons:
What’s the Solution?
The best way to resolve all the battery issues is to use compatible and high-quality batteries for your wireless microphone. Here are some workable remedies:
These simple measures can improve the battery life, and also resolve many of the wireless microphone problems related to their batteries.
Out-of-Range Microphone Operation
Out-of-range operation with wireless systems is when you are too far off from the wireless receiver or have moved far beyond your mic system’s operating range. When that happens, you struggle with weak audio signal, audio dropouts, distortion, and noise.
Typically, the following factors contribute to out-of-range operation.
What’s the Solution?
To mitigate the out-of-range challenges, stay within your wireless mic’s range. You can easily do this by practicing the following:
Sometimes wireless microphone problems are an amalgamation of all the challenges above. Employ the hacks one by one, and keep checking your mic’s performance to figure out the solution that best works for you.
Additionally, if you are currently using a low-quality wireless microphone, invest in a good-quality one. A common problem is not having impeccable audio quality which is resolved best by getting a high-end wireless microphone.
Sound Problems with Microphones and Their Solutions
The issue you are experiencing is the inability to get any sound on your microphone.
This issue often stems from different factors, so let’s discuss them along with their workable solutions.
Microphone Volume Issues
If your mic is properly connected to your audio interface or computer, and there are no issues with the permissions, third-party apps, malware, or anything else, perhaps the problem lies in the mic’s sound settings.
What’s the Solution?
Mic’s Privacy Settings
Possibly, the mic’s privacy settings are such that they keep you from using the mic conveniently.
What’s the Solution?
Test the Mic’s Sound
Lastly, you need to test your microphone’s sound and audio to ensure you can hear yourself in it.
If you still cannot hear your own voice in mic, check our latest read on the subject to resolve your issue.
Moreover, make certain to properly configure your system’s audio output settings. Setting your headphones or speakers as the system’s default audio output device is a good idea too.
Let’s Fix the Problems
Where there is a will, there is a way. You want all your microphone issues to leave you in peace which is why you came here.
Now that you know a range of microphone problems and solutions, try out the antidotes and I’m positive your mic will start working properly.
Frequently Asked Questions

Sharoon Shahid
Hi! I’m Sharoon Shahid, founder of Audiblearray. With a decade of experience in using mics, I’m here to guide you on your audio journey and save you from gear pitfalls!